
When integrating third-party applications, automation scripts, backup utilities, or sync tools with Google Drive, configuring dedicated OAuth 2.0 credentials (client_id and client_secret) is essential.
Many tools fall back to shared public credentials by default. When using these generic keys, thousands of users worldwide compete for the exact same API quota pool, quickly triggering rate-limit errors:
Failed to copy: googleapi: Error 429: User-rate limit exceeded, rateLimitExceeded
HTTP 429: Too Many Requests
The definitive solution to eliminate throttling and rejected requests is straightforward: create your own free Google Cloud Platform (GCP) project with dedicated OAuth 2.0 Client credentials. Below is the step-by-step visual runbook with live Google Cloud Console screenshots.
1. Why create a dedicated Client ID: Performance and Security#
Creating your own OAuth project in Google Cloud addresses two vital infrastructure pillars:
- Private Quotas and Uncontested Throughput: Shared public keys force millions of external requests to compete for the same global bucket. Your own GCP project provides dedicated, generous private quotas based on the modern Drive API quota units model (with minute-by-minute and per-user allowances spanning hundreds of thousands of units, plus a massive daily courtesy limit), completely eliminating
429 Rate Limit Exceededstalls. You can monitor your project's dynamic limits and live consumption under APIs & Services → Quotas or via console.cloud.google.com/apis/api/drive.googleapis.com/quotas. - Granular Least-Privilege Access: You control the exact permission boundaries (such as read-only or scoped to specific folders), preventing third-party clients from demanding excessive privileges.
- Protection Against Mass Revocation: Public credentials embedded in open-source tools can be abruptly blocked or revoked by Google if bad actors abuse them. With your own app, authentication health is strictly within your control.
- Audit Logging & Immediate Revocation: The Google Cloud Console provides full audit visibility over incoming API traffic, anomalies, and active sessions, allowing you to instantly revoke access if an endpoint or credential is compromised.
2. Step-by-step: creating the project in Google Cloud#
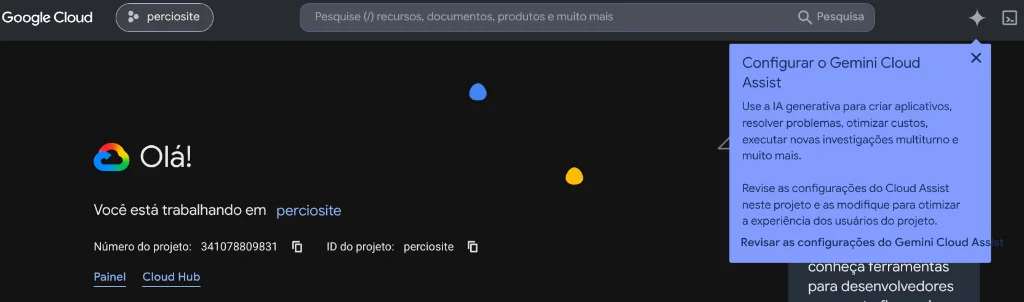
Step 1: Access the Google Cloud Console#
Log in to the Google Cloud developer console using the Google Account that holds your Drive files (or your administrative account):
https://console.cloud.google.com/
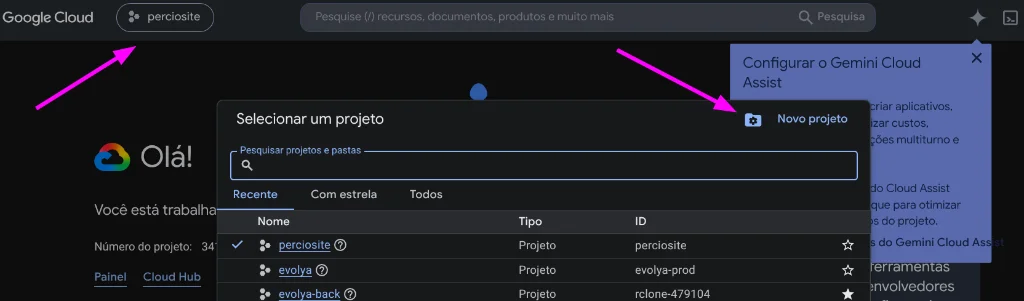
Step 2: Open project selector and click 'New Project'#
In the top navigation bar (beside the Google Cloud brand logo), click on the current project dropdown. A modal dialog will list your active projects. In the top right corner of this modal, click the New Project button (folder icon with a gear):
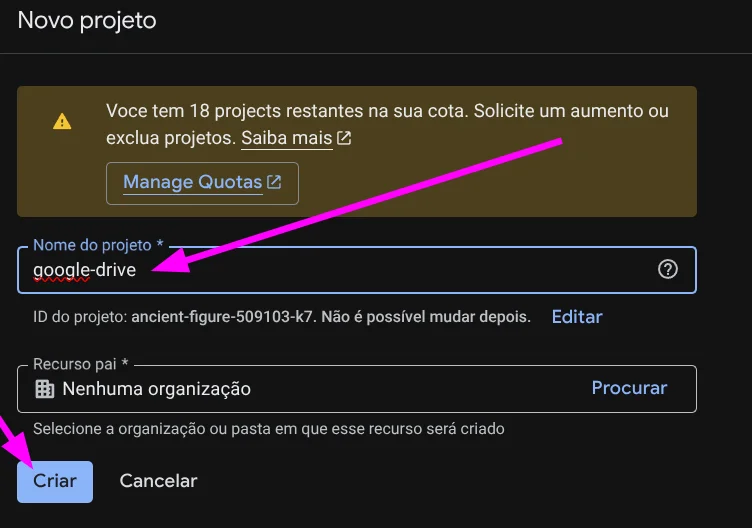
Step 3: Set a descriptive project name and click 'Create'#
In the project creation form, enter a clear, intuitive Project name for your infrastructure (such as google-drive or rclone-backup). If using a personal Google Account, the Location field can remain set to No organization. Then click Create:
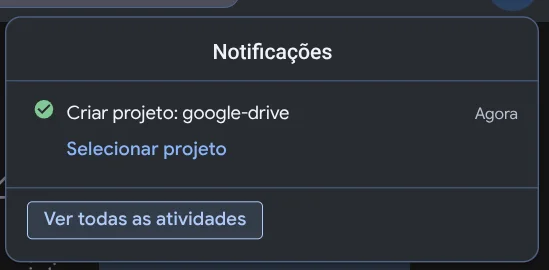
Step 4: Wait for provisioning and click 'Select Project'#
Project provisioning takes just a few seconds. A notification card will appear in the top-right corner confirming the project has been created. Click directly on Select Project:
Step 5: Verify active project and open the navigation menu#
Ensure that the top bar now displays your newly created project (google-drive). Next, click the main navigation hamburger menu (☰) in the upper-left corner beside the Google Cloud logo:

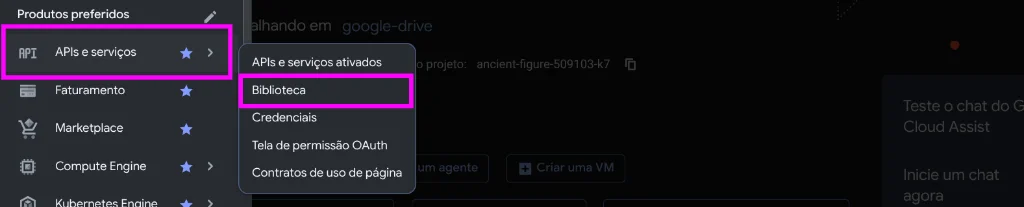
Step 6: Navigate to APIs & Services > Library#
In the left navigation drawer, hover over or click APIs & Services, and from the expanded submenu, select Library:
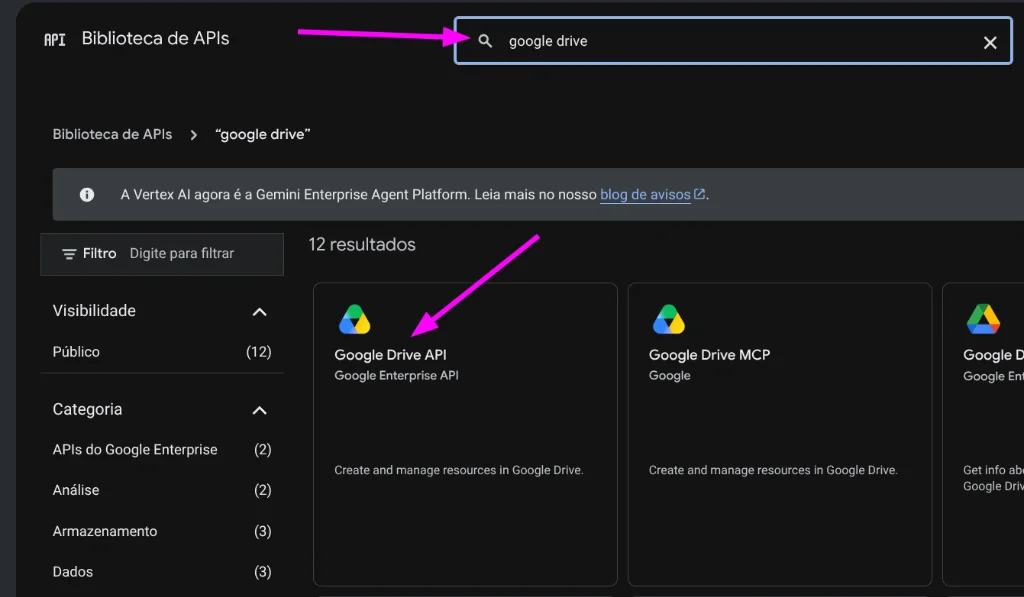
Step 7: Search for and select the Google Drive API#
In the central API Library search box, type google drive and press Enter. In the search results, click on the official Google Drive API card:
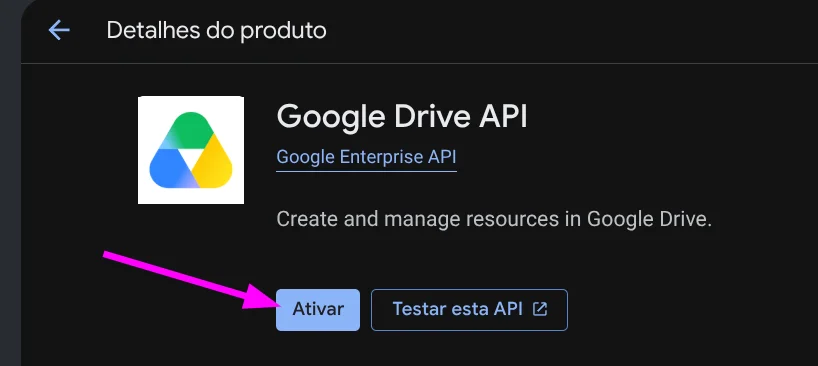
Step 8: Enable the Google Drive API#
On the product details page, click the blue Enable button to activate Google Drive REST API endpoints for your project:
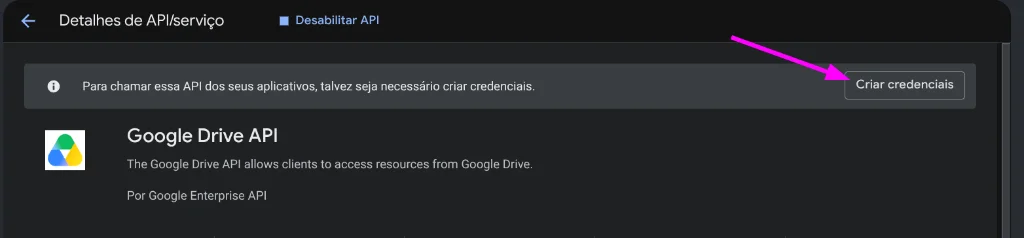
Step 9: Initiate credential creation#
Once activation completes, the console displays the API/Service details dashboard. In the top notification banner, click the Create credentials button:
Step 10: Select credential type and choose 'User data'#
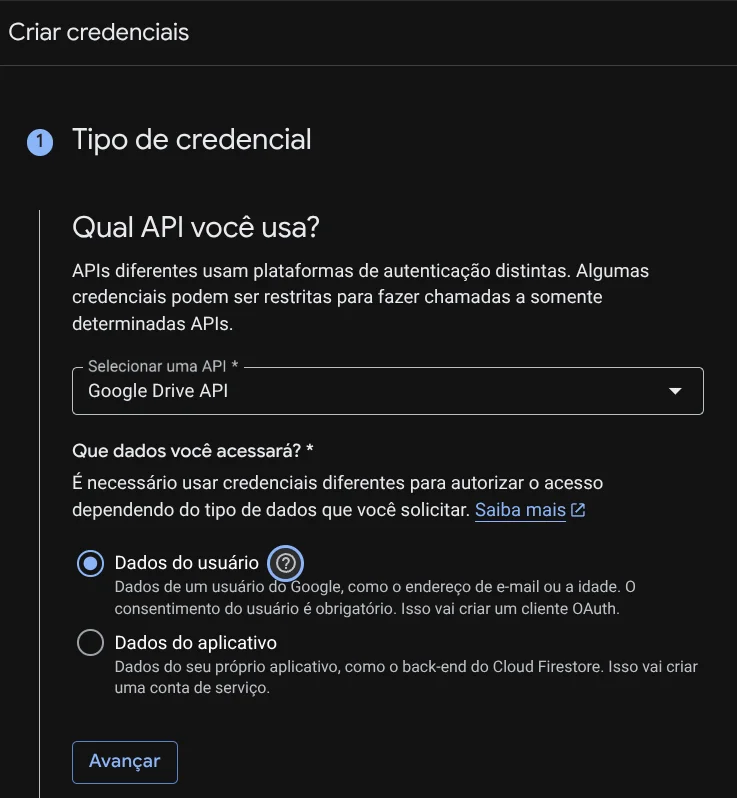
In the interactive configuration wizard (Credential Type), specify the following parameters:
- Which API are you using?: Keep
Google Drive APIselected. - What data will you be accessing?: Categorically select User data (since your local tools, scripts, or apps act on behalf of your personal account to manage files, requiring standard OAuth user consent).
Click Next to proceed to the consent screen setup:
Step 11: Configure the OAuth Consent Screen#
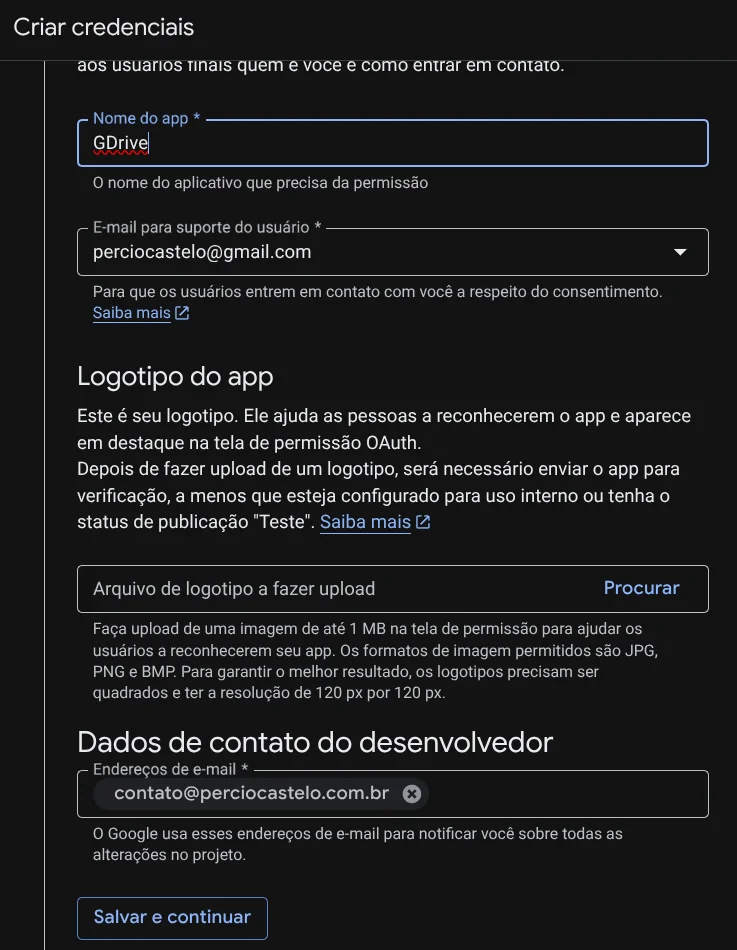
In step 2 of the wizard (OAuth Consent Screen), provide the required public application details:
- App name: Enter an identifiable name adhering to Google's branding policies (e.g.,
meugdrive). Branding Tip: Avoid using isolated trademarks like "Google" or "Google Drive", which trigger trademark review restrictions. Custom strings likemeugdriveare approved instantly without friction. - User support email: Select your own email address from the dropdown.
- App logo (Crucial): Leave this field completely blank! Uploading any logo forces Google to trigger formal brand and security verification reviews, which can block app usage for weeks. Leaving it blank allows immediate use in testing mode.
- Developer contact information: Enter your email address for administrative project notifications.
Click Save and continue:
Step 12: Open the API Scopes selector#
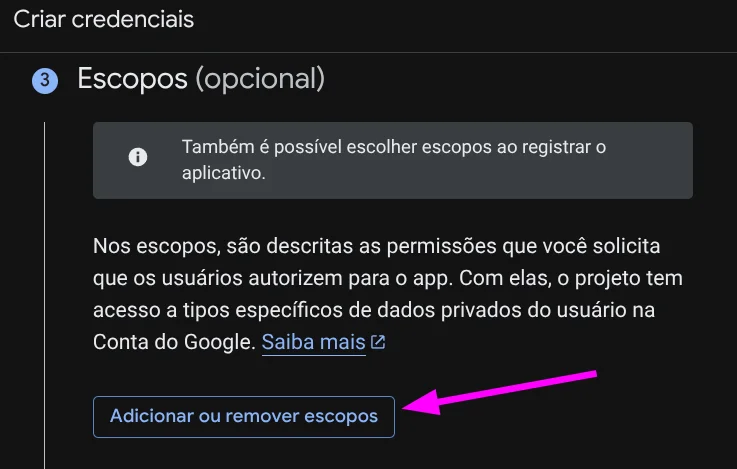
In step 3 of the wizard (Scopes), you define the specific permission boundaries granted to your client application. Click Add or remove scopes:
Step 13: Filter and select Google Drive API scopes#
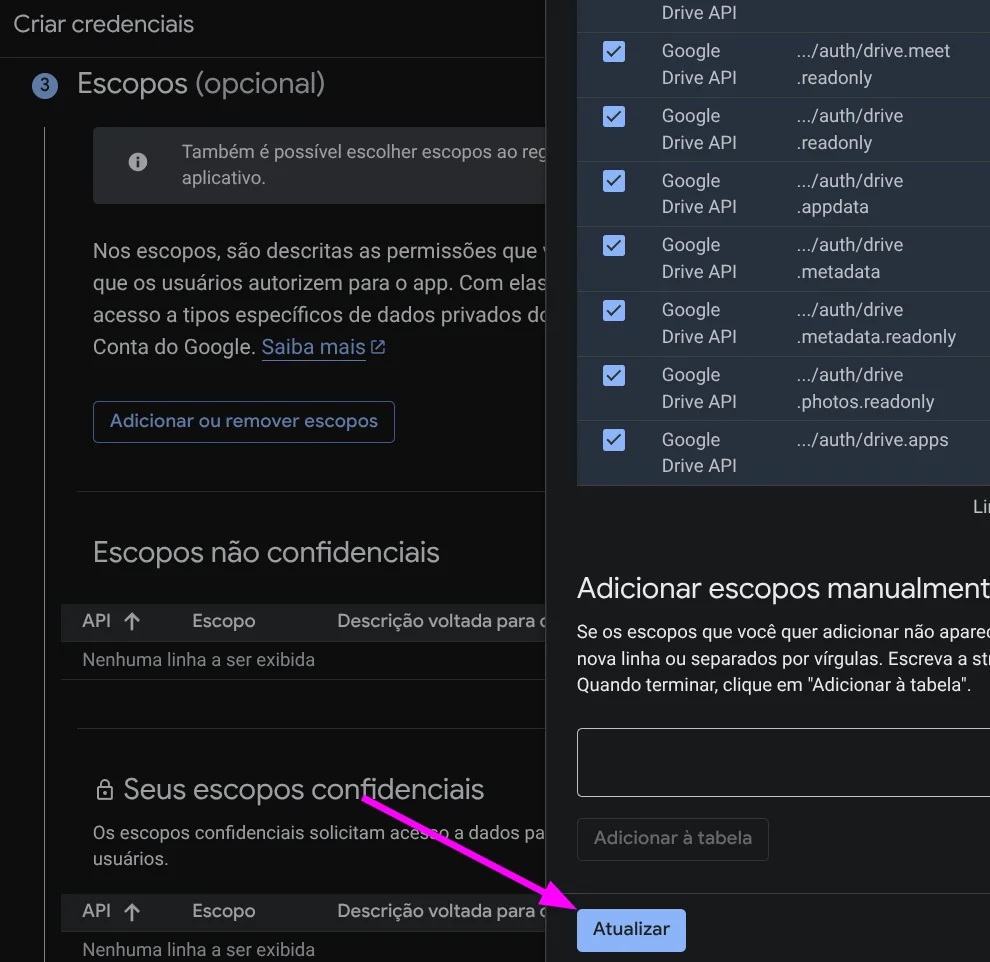
A slide-over drawer will appear on the right side. In the filter box, type drive to list available scopes and select the permission matching your operational needs:
.../auth/drive— (Recommended for Rclone / Primary Scope): Full read, write, sync, and delete access across folders and files in Google Drive..../auth/drive.readonly— Strict read-only and download access (ideal for one-way mirror downloads or read-only mounts)..../auth/drive.file— Scoped access only to files created or opened by this specific application..../auth/drive.metadata.readonly— Read-only access to file and folder metadata attributes.
After selecting the scope(s), click the blue Update button at the bottom of the drawer. Once closed, scroll down the main wizard page and click Save and continue.
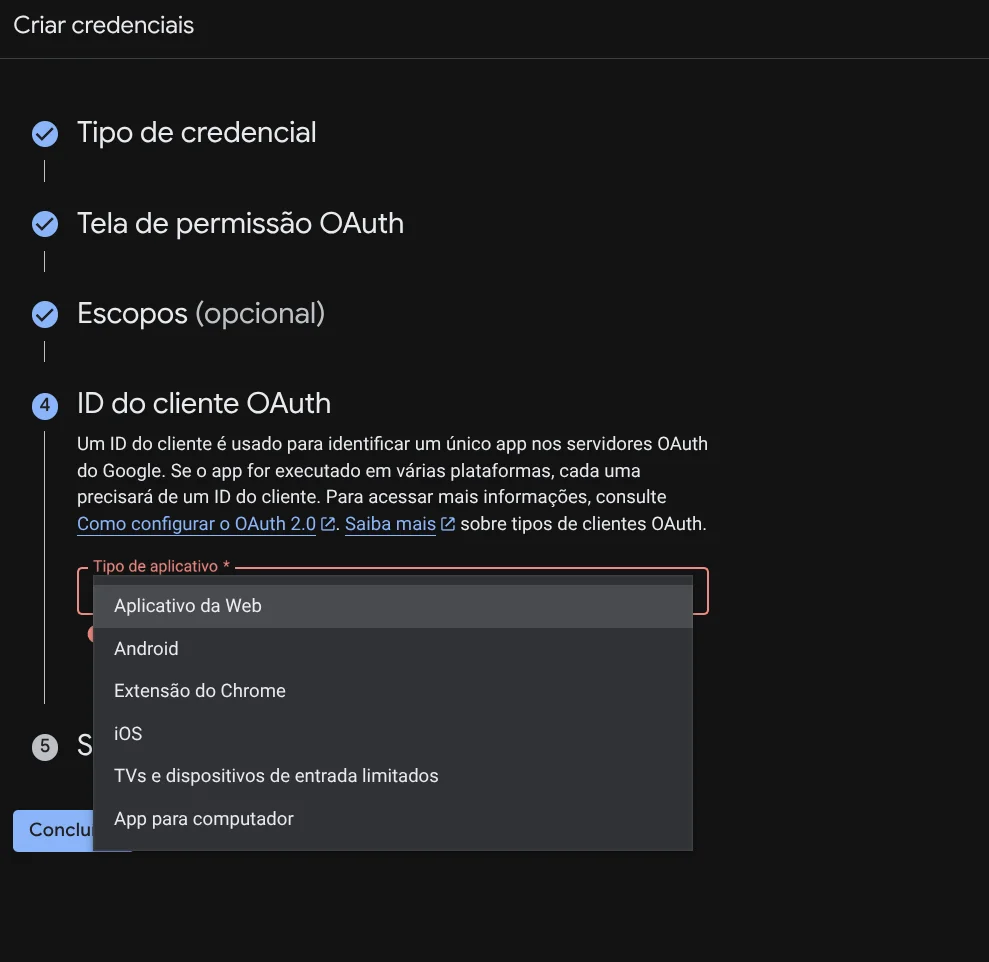
Step 14: Select Application Type (Desktop App)#
In step 4 of the wizard (OAuth Client ID), select the client runtime architecture from the Application type: dropdown:
For CLI tools, local automation utilities, or background sync scripts (such as Rclone or Python desktop scripts), select Desktop app. (Or choose the corresponding type if building a Web application, Android app, or backend service):
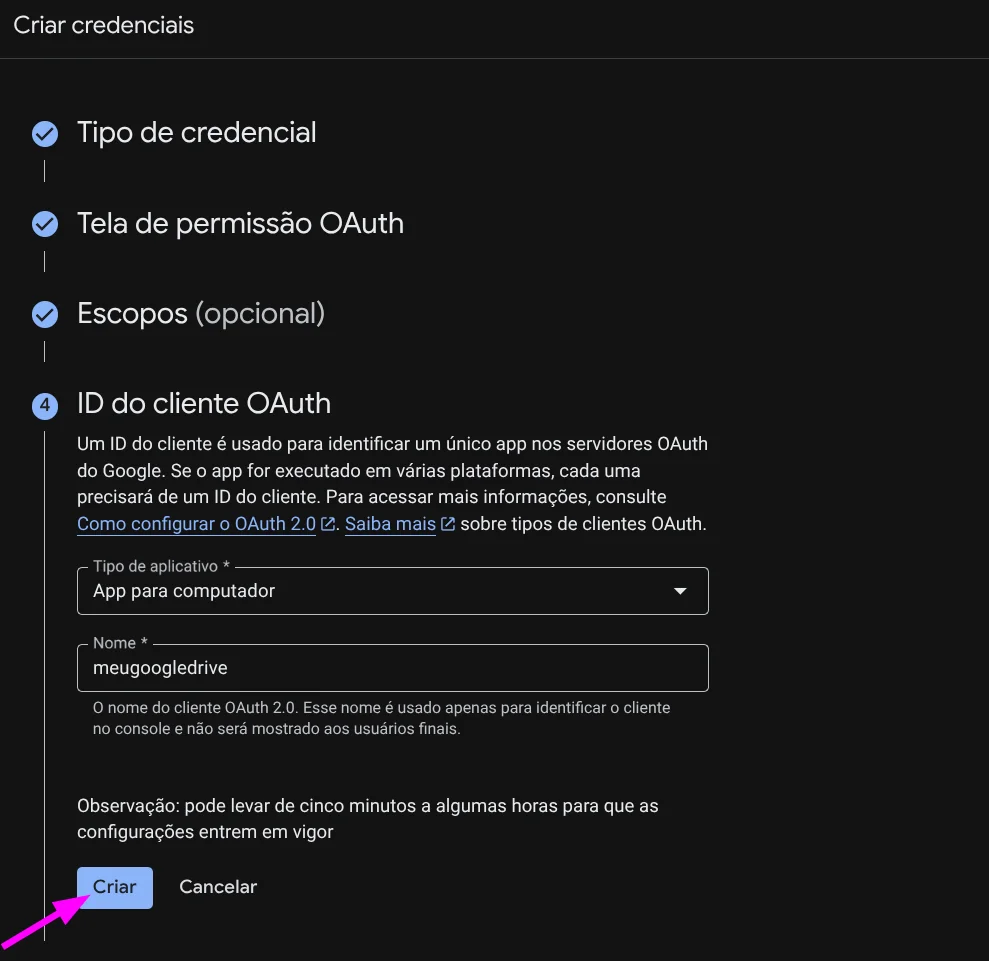
Step 15: Name the OAuth client and click 'Create'#
In the Name: field, provide an internal reference name (such as meugoogledrive). This name is only visible inside your GCP console for organizational purposes.
Google Cloud Note: The console indicates that new credentials may take between five minutes to a few hours to propagate globally across Google's API edge (though in practice activation is virtually instantaneous).
Click Create:
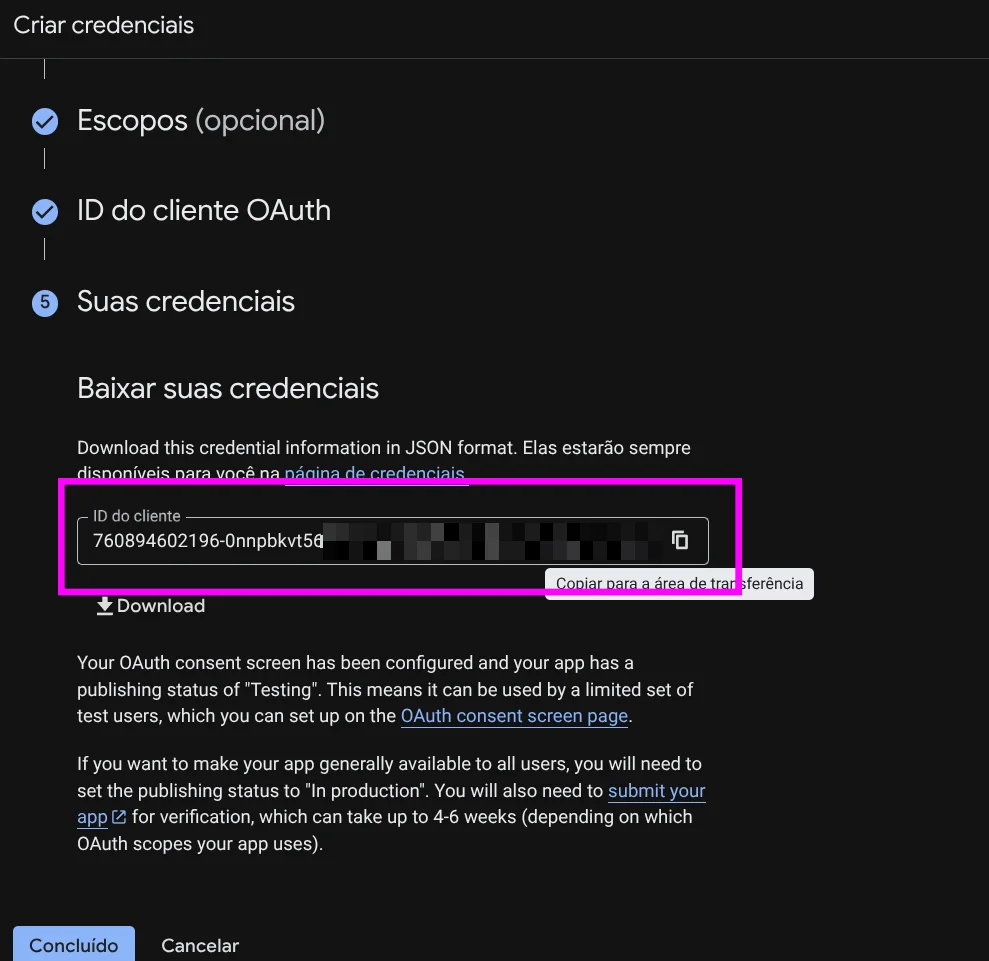
Step 16: Retrieve your Client ID and download JSON credentials#
Step 5 (Your Credentials) displays the newly issued credential. The Client ID field contains your unique client identifier string, complete with quick-copy and Download JSON options (saving the full credentials.json containing both client_id and client_secret).
Copy your Client ID or download the JSON file to your secure password vault, then click Done:
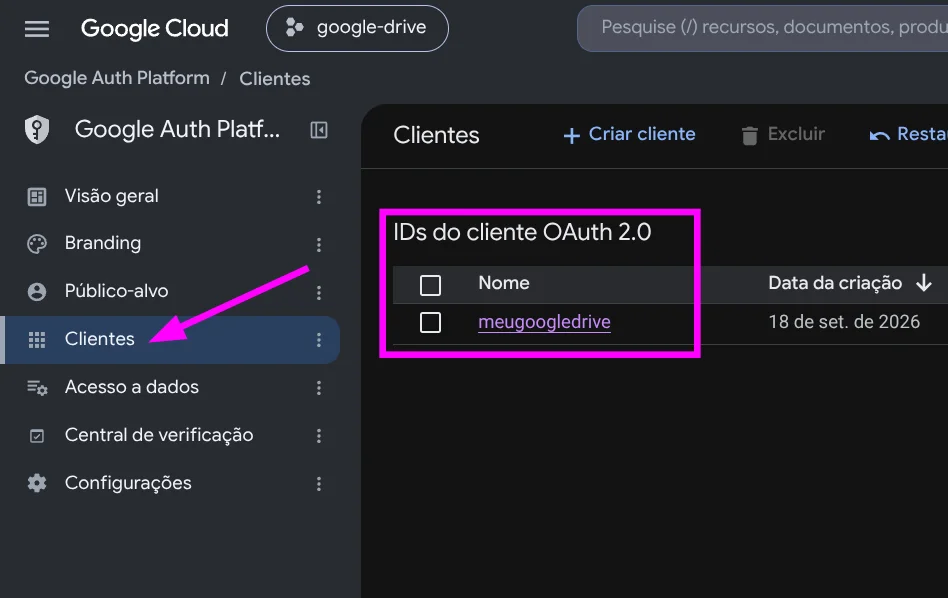
Step 17: Navigate to the 'Clients' section#
With the Client ID secured, retrieve your Client Secret. In the left navigation menu under Google Auth Platform, click Clients and select the OAuth client you just created (meugoogledrive):
Step 18: Copy the Client Secret#
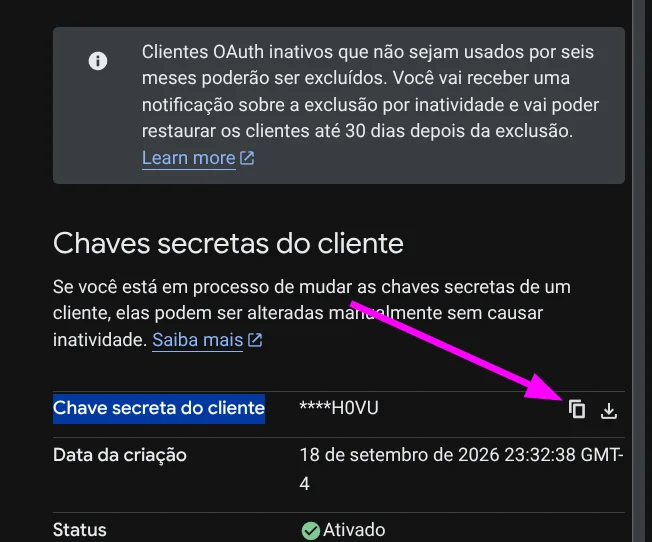
Under the client details view, locate the Client secrets section. Click the copy icon in the Client secret field and store the key securely in your credentials store:
Step 19: Testing vs. Production Publishing Status#
Before deploying your credentials, understand Google's OAuth publishing policies:
- Testing Mode (Recommended): Only email accounts explicitly added as Test users can authenticate through the app (up to 100 users). This is the optimal configuration for personal use, internal backups, and dedicated servers, bypassing weeks of formal Google verification.
- In Production Mode: Any Google account can authenticate. However, requesting Google Drive scopes requires submitting a privacy policy, domain verification, and video demonstrations (taking 4–6 weeks for approval).
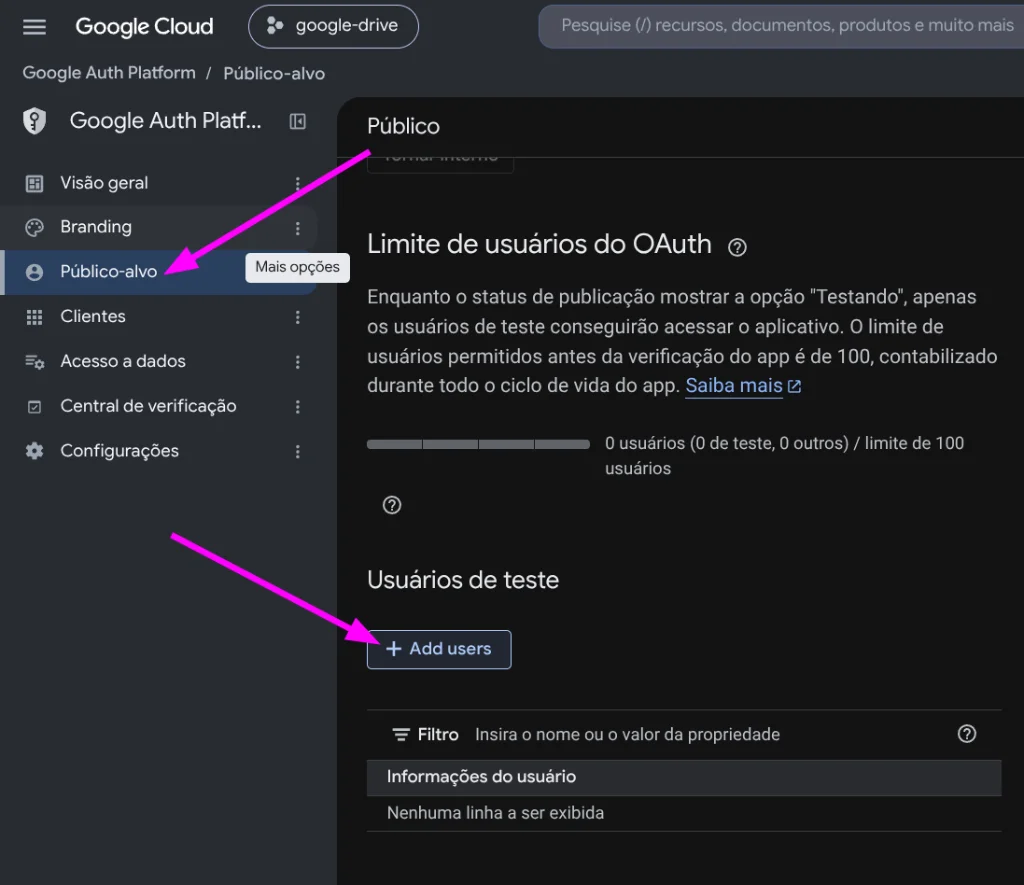
To add your email address in Testing mode, go to the left menu under Google Auth Platform and click Audience. In the Test users card, click + Add users:
Step 20: Add authorized test user email and save#
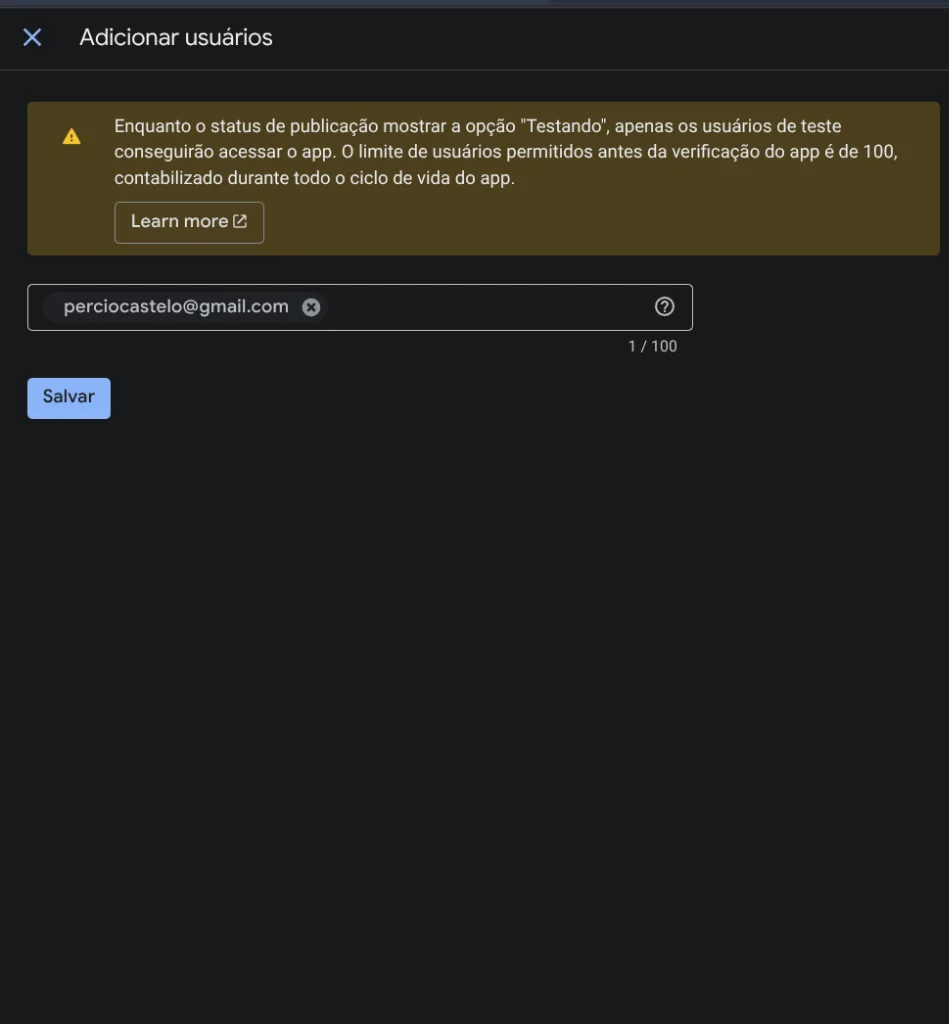
In the Add users slide-over drawer, type the email address of the Google Account holding the Drive files you wish to access. Press Enter, then click Save:
Step 21: OAuth Handshake and 'Google hasn't verified this app'#
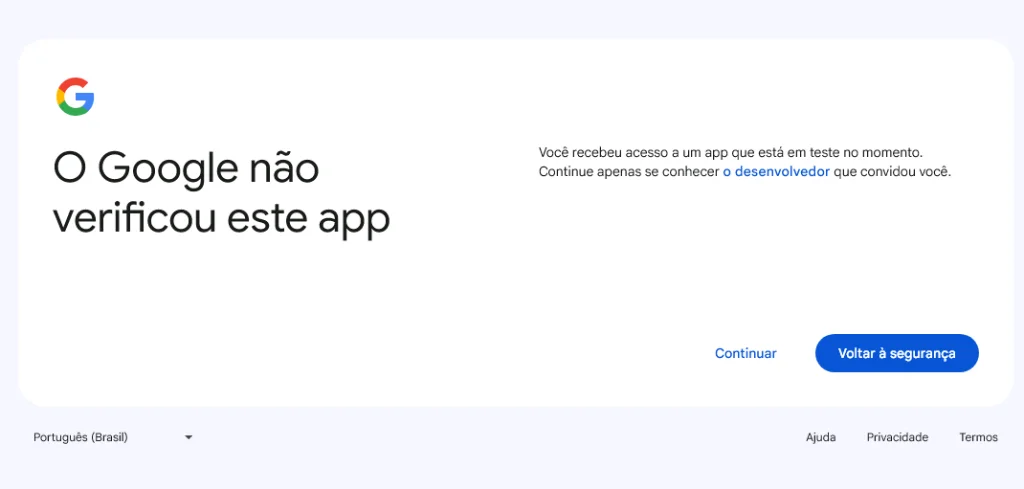
When authenticating your client for the first time via OAuth 2.0 (in Rclone, a Python script, or local app), Google detects the testing mode status and displays a security warning:
Google hasn't verified this app: You’ve been given access to an app that’s currently being tested. Only continue if you know the developer that invited you.
Because you created this project in your own developer account, click Continue with complete confidence:
Step 22: Grant Google Drive permissions and finalize#
On the final consent screen, Google prompts for confirmation: "meugdrive wants to access your Google Account - See, edit, create, and delete all of your Google Drive files".
Click Continue in the bottom-right corner to grant access:
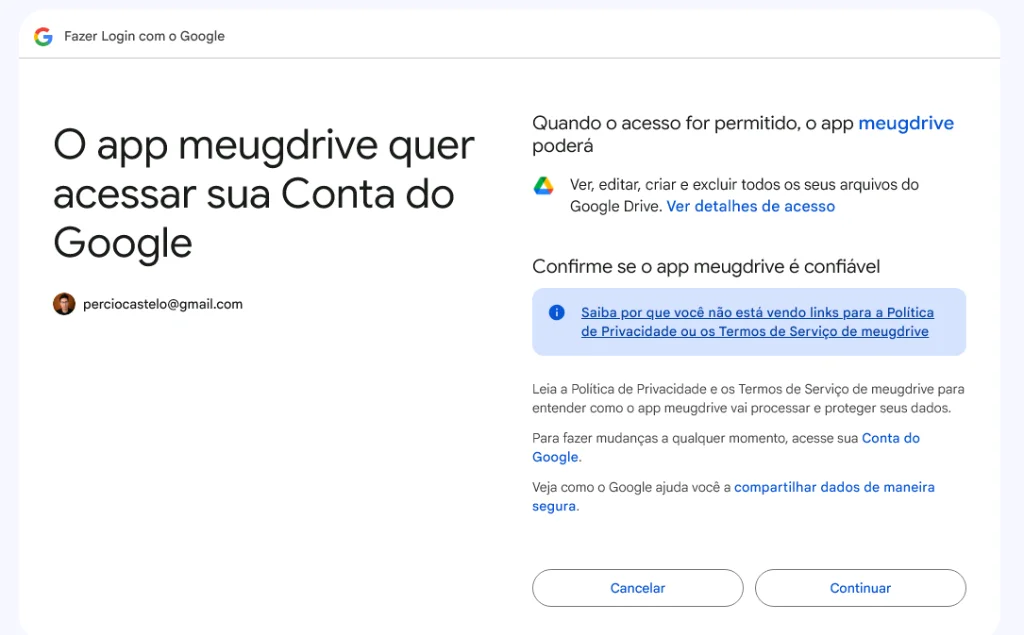
All done! Your browser will confirm successful authentication. You can now use your dedicated OAuth 2.0 Client ID and Client Secret in Rclone, automation scripts, or cloud utilities, fully immune to shared rate-limiting errors!
3. Where to use it: Integrating your credentials into Rclone#
Now that you have your dedicated OAuth 2.0 credential pair, the most common sysadmin use case is plugging them into Rclone to mount Google Drive as a virtual Windows drive or execute automated backups:
- In your terminal, run
rclone configand create a new remote selectingdrive. - When prompted for
client_id>, paste your dedicated Client ID string from Google Cloud. - At the subsequent prompt (
client_secret>), paste your dedicated Client Secret:
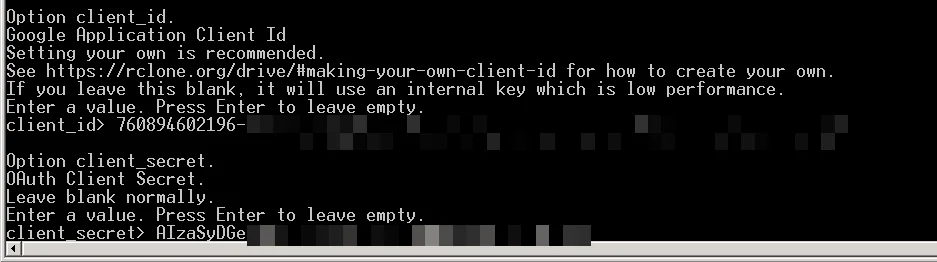
Once authorized, Rclone persists your dedicated credentials inside the rclone.conf configuration file:
[googledrive]
type = drive
client_id = 730623253245-xxxx.apps.googleusercontent.com
client_secret = GOCSPX-xxxx
scope = drive
token = {"access_token":"...","token_type":"Bearer","refresh_token":"...","expiry":"..."}
With the remote configured, you can mount Google Drive as a native local drive letter in Windows Explorer (using WinFSP) with dedicated bandwidth and zero risk of rate-limiting locks. Follow the full hands-on mounting tutorial here: What is WinFSP, How It Works, and Is It Safe? Dissecting the Windows FUSE Driver.
Was this article helpful?
Leave a quick reaction to help prioritize future technical guides:
See also



This post is licensed under CC BY-NC.
Comments
Join the discussion below.
0 comments